Introduction

![]()
An open-source incident management tool that supports alerting across multiple channels with easy custom messaging and on-call integrations. Designed for modern DevOps teams to quickly respond to production incidents.
Features
- 🚨 Multi-channel Alerts: Send incident notifications to Slack, Microsoft Teams, Telegram, and Email (more channels coming!)
- 📝 Custom Templates: Define your own alert messages using Go templates
- 🔧 Easy Configuration: YAML-based configuration with environment variables support
- 📡 REST API: Simple HTTP interface to receive alerts
- 📡 On-call: On-call integrations with AWS Incident Manager

Contributing
We welcome contributions! Please follow these steps:
- Fork the repository Versus Incident
- Create your feature branch (
git checkout -b feature/amazing-feature) - Commit your changes (
git commit -m 'Add some amazing feature') - Push to the branch (
git push origin feature/amazing-feature) - Open a Pull Request
License
Distributed under the MIT License. See LICENSE for more information.
Support This Project
Help us maintain Versus Incident! Your sponsorship:
🔧 Funds critical infrastructure
🚀 Accelerates new features like Viber/Lark integration, Web UI and On-call integrations
Getting Started
Prerequisites
- Go 1.20+
- Docker 20.10+ (optional)
- Slack workspace (for Slack notifications)
Easy Installation with Docker
docker run -p 3000:3000 \
  -e SLACK_ENABLE=true \
  -e SLACK_TOKEN=your_token \
  -e SLACK_CHANNEL_ID=your_channel \
  ghcr.io/versuscontrol/versus-incident
Or Build from source
# Clone the repository
git clone https://github.com/VersusControl/versus-incident.git
cd versus-incident

# Build with Go
go build -o versus-incident ./cmd/main.go
chmod +x versus-incident
Create run.sh:
#!/bin/bash
export SLACK_ENABLE=true
export SLACK_TOKEN=your_token
export SLACK_CHANNEL_ID=your_channel

./versus-incident
Development
Docker
Basic Deployment
docker run -d \
  -p 3000:3000 \
  -e SLACK_ENABLE=true \
  -e SLACK_TOKEN=your_slack_token \
  -e SLACK_CHANNEL_ID=your_channel_id \
  --name versus \
  ghcr.io/versuscontrol/versus-incident
With Custom Templates
Create a configuration file:
mkdir -p ./config && touch config.yaml
config.yaml:
name: versus
host: 0.0.0.0
port: 3000

alert:
  slack:
    enable: true
    token: ${SLACK_TOKEN}
    channel_id: ${SLACK_CHANNEL_ID}
    template_path: "/app/config/slack_message.tmpl"

  telegram:
    enable: false

  msteams:
    enable: false
Configuration Notes
Ensure template_path in config.yaml matches container path:
alert:
  slack:
    template_path: "/app/config/slack_message.tmpl" # For containerized env
Slack Template
Create your Slack message template, for example config/slack_message.tmpl:
🔥 *Critical Error in {{.ServiceName}}*

❌ Error Details:
```{{.Logs}}```

Owner <@{{.UserID}}> please investigate
Run with volume mount:
docker run -d \
  -p 3000:3000 \
  -v $(pwd)/config:/app/config \
  -e SLACK_ENABLE=true \
  -e SLACK_TOKEN=your_slack_token \
  -e SLACK_CHANNEL_ID=your_channel_id \
  --name versus \
  ghcr.io/versuscontrol/versus-incident
Verify template mounting:
docker exec versus ls -l /app/config
To test, simply send an incident to Versus:
curl -X POST http://localhost:3000/api/incidents \
  -H "Content-Type: application/json" \
  -d '{
    "Logs": "[ERROR] This is an error log from User Service that we can obtain using Fluent Bit.",
    "ServiceName": "order-service",
    "UserID": "SLACK_USER_ID"
  }'
Response:
{
    "status":"Incident created"
}
Result:
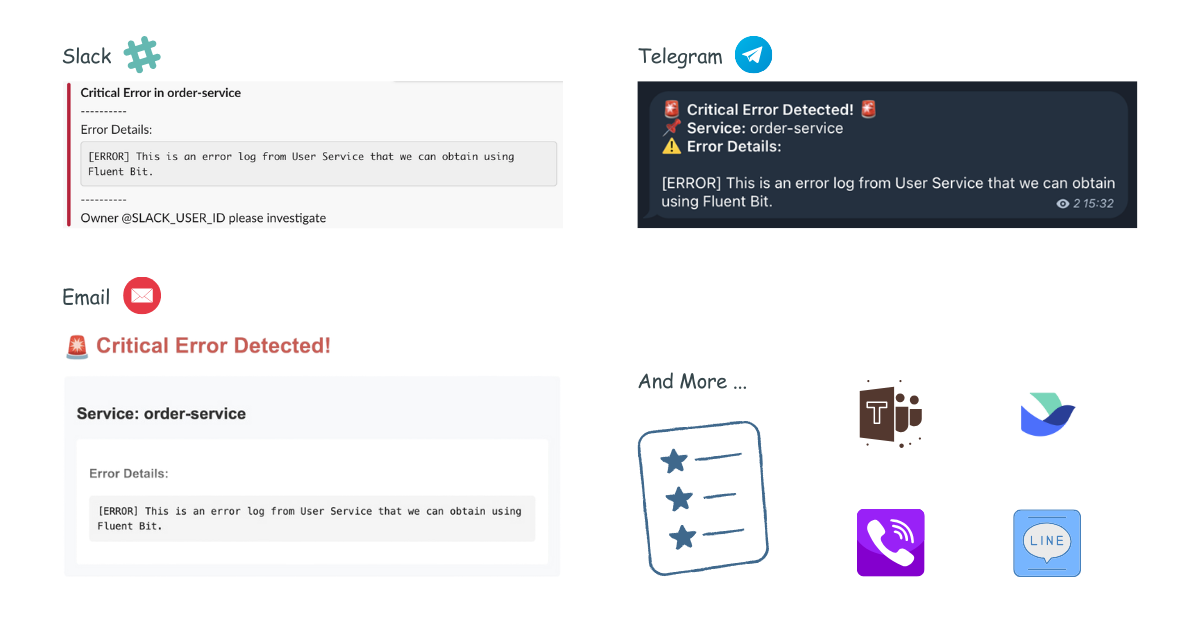
Other Templates
Telegram Template
For Telegram, you can use HTML formatting. Create your Telegram message template, for example config/telegram_message.tmpl:
🚨 <b>Critical Error Detected!</b> 🚨
📌 <b>Service:</b> {{.ServiceName}}
⚠️ <b>Error Details:</b>
{{.Logs}}
This template will be parsed with HTML tags when sending the alert to Telegram.
Email Template
Create your email message template, for example config/email_message.tmpl:
Subject: Critical Error Alert - {{.ServiceName}}

Critical Error Detected in {{.ServiceName}}
----------------------------------------

Error Details:
{{.Logs}}

Please investigate this issue immediately.

Best regards,
Versus Incident Management System
This template supports both plain text and HTML formatting for email notifications.
Microsoft Teams Template
Create your Teams message template, for example config/msteams_message.tmpl:
**Critical Error in {{.ServiceName}}**

**Error Details:**

```{{.Logs}}```

Please investigate immediately
Kubernetes
- Create a secret for Slack:
# Create secret
kubectl create secret generic versus-secrets \
  --from-literal=slack_token=$SLACK_TOKEN \
  --from-literal=slack_channel_id=$SLACK_CHANNEL_ID
- Create ConfigMap for config and template file, for example
versus-config.yaml:
apiVersion: v1
kind: ConfigMap
metadata:
  name: versus-config
data:
  config.yaml: |
    name: versus
    host: 0.0.0.0
    port: 3000

    alert:
      slack:
        enable: true
        token: ${SLACK_TOKEN}
        channel_id: ${SLACK_CHANNEL_ID}
        template_path: "/app/config/slack_message.tmpl"

      telegram:
        enable: false

  slack_message.tmpl: |
    *Critical Error in {{.ServiceName}}*
    ----------
    Error Details:
    ```
    {{.Logs}}
    ```
    ----------
    Owner <@{{.UserID}}> please investigate
kubectl apply -f versus-config.yaml
- Create
versus-deployment.yaml:
apiVersion: apps/v1
kind: Deployment
metadata:
  name: versus-incident
spec:
  replicas: 2
  selector:
    matchLabels:
      app: versus-incident
  template:
    metadata:
      labels:
        app: versus-incident
    spec:
      containers:
      - name: versus-incident
        image: ghcr.io/versuscontrol/versus-incident
        ports:
        - containerPort: 3000
        livenessProbe:
          httpGet:
            path: /healthz
            port: 3000
        env:
          - name: SLACK_CHANNEL_ID
            valueFrom:
              secretKeyRef:
                name: versus-secrets
                key: slack_channel_id
          - name: SLACK_TOKEN
            valueFrom:
              secretKeyRef:
                name: versus-secrets
                key: slack_token
        volumeMounts:
        - name: versus-config
          mountPath: /app/config/config.yaml
          subPath: config.yaml
        - name: versus-config
          mountPath: /app/config/slack_message.tmpl
          subPath: slack_message.tmpl
      volumes:
      - name: versus-config
        configMap:
          name: versus-config

---
apiVersion: v1
kind: Service
metadata:
  name: versus-service
spec:
  selector:
    app: versus
  ports:
    - protocol: TCP
      port: 3000
      targetPort: 3000
- Apply:
kubectl apply -f versus-deployment.yaml
- Verify template mounting:
kubectl exec -it <pod-name> -- ls -l /app/config
SNS Usage
docker run -d \
  -p 3000:3000 \
  -e SLACK_ENABLE=true \
  -e SLACK_TOKEN=your_slack_token \
  -e SLACK_CHANNEL_ID=your_channel_id \
  -e SNS_ENABLE=true \
  -e SNS_TOPIC_ARN=$SNS_TOPIC_ARN \
  -e SNS_HTTPS_ENDPOINT_SUBSCRIPTION=https://your-domain.com \
  -e AWS_ACCESS_KEY_ID=$AWS_ACCESS_KEY \
  -e AWS_SECRET_ACCESS_KEY=$AWS_SECRET_KEY \
  --name versus \
  ghcr.io/versuscontrol/versus-incident
Send test message using AWS CLI:
aws sns publish \
  --topic-arn $SNS_TOPIC_ARN \
  --message '{"ServiceName":"test-service","Logs":"[ERROR] Test error","UserID":"U12345"}' \
  --region $AWS_REGION
A key real-world application of Amazon SNS involves integrating it with CloudWatch Alarms. This allows CloudWatch to publish messages to an SNS topic when an alarm state changes (e.g., from OK to ALARM), which can then trigger notifications to Slack, Telegram, or Email via Versus Incident with a custom template.
On-call
Currently, Versus support On-call integrations with AWS Incident Manager. Updated configuration example with on-call features:
name: versus
host: 0.0.0.0
port: 3000
public_host: https://your-ack-host.example # Required for on-call ack

# ... existing alert configurations ...

oncall:
  ### Enable overriding using query parameters
  # /api/incidents?oncall_enable=false => Set to `true` or `false` to enable or disable on-call for a specific alert
  # /api/incidents?oncall_wait_minutes=0 => Set the number of minutes to wait for acknowledgment before triggering on-call. Set to `0` to trigger immediately
  enable: false
  wait_minutes: 3 # If you set it to 0, it means there’s no need to check for an acknowledgment, and the on-call will trigger immediately

  aws_incident_manager:
    response_plan_arn: ${AWS_INCIDENT_MANAGER_RESPONSE_PLAN_ARN}

redis: # Required for on-call functionality
  insecure_skip_verify: true # dev only
  host: ${REDIS_HOST}
  port: ${REDIS_PORT}
  password: ${REDIS_PASSWORD}
  db: 0
Explanation:
The oncall section includes:
enable: A boolean to toggle on-call functionality (default:false).wait_minutes: Time in minutes to wait for an acknowledgment before escalating (default:3). Setting it to0triggers the on-call immediately.aws_incident_manager: Contains theresponse_plan_arn, which links to an AWS Incident Manager response plan via an environment variable.
The redis section is required when oncall.enable is true. It configures the Redis instance used for state management or queuing, with settings like host, port, password, and db.
For detailed information on integration, please refer to the document here: On-call setup with Versus.
Complete Configuration
A sample configuration file is located at config/config.yaml:
name: versus
host: 0.0.0.0
port: 3000
public_host: https://your-ack-host.example # Required for on-call ack

alert:
  debug_body: true  # Default value, will be overridden by DEBUG_BODY env var

  slack:
    enable: false  # Default value, will be overridden by SLACK_ENABLE env var
    token: ${SLACK_TOKEN}            # From environment
    channel_id: ${SLACK_CHANNEL_ID}  # From environment
    template_path: "config/slack_message.tmpl"

  telegram:
    enable: false  # Default value, will be overridden by TELEGRAM_ENABLE env var
    bot_token: ${TELEGRAM_BOT_TOKEN} # From environment
    chat_id: ${TELEGRAM_CHAT_ID} # From environment
    template_path: "config/telegram_message.tmpl"

  email:
    enable: false # Default value, will be overridden by EMAIL_ENABLE env var
    smtp_host: ${SMTP_HOST} # From environment
    smtp_port: ${SMTP_PORT} # From environment
    username: ${SMTP_USERNAME} # From environment
    password: ${SMTP_PASSWORD} # From environment
    to: ${EMAIL_TO} # From environment
    subject: ${EMAIL_SUBJECT} # From environment
    template_path: "config/email_message.tmpl"

  msteams:
    enable: false # Default value, will be overridden by MSTEAMS_ENABLE env var
    webhook_url: ${MSTEAMS_WEBHOOK_URL}
    template_path: "config/msteams_message.tmpl"

queue:
  enable: true
  debug_body: true

  # AWS SNS
  sns:
    enable: false
    https_endpoint_subscription_path: /sns # URI to receive SNS messages, e.g. ${host}:${port}/sns or ${https_endpoint_subscription}/sns
    # Options If you want to automatically create an sns subscription
    https_endpoint_subscription: ${SNS_HTTPS_ENDPOINT_SUBSCRIPTION} # If the user configures an HTTPS endpoint, then an SNS subscription will be automatically created, e.g. https://your-domain.com
    topic_arn: ${SNS_TOPIC_ARN}

oncall:
  ### Enable overriding using query parameters
  # /api/incidents?oncall_enable=false => Set to `true` or `false` to enable or disable on-call for a specific alert
  # /api/incidents?oncall_wait_minutes=0 => Set the number of minutes to wait for acknowledgment before triggering on-call. Set to `0` to trigger immediately
  enable: false
  wait_minutes: 3 # If you set it to 0, it means there’s no need to check for an acknowledgment, and the on-call will trigger immediately

  aws_incident_manager:
    response_plan_arn: ${AWS_INCIDENT_MANAGER_RESPONSE_PLAN_ARN}

redis: # Required for on-call functionality
  insecure_skip_verify: true # dev only
  host: ${REDIS_HOST}
  port: ${REDIS_PORT}
  password: ${REDIS_PASSWORD}
  db: 0
Environment Variables
The application relies on several environment variables to configure alerting services. Below is an explanation of each variable:
Common
| Variable | Description |
|---|---|
DEBUG_BODY | Set to true to enable print body send to Versus Incident. |
Slack Configuration
| Variable | Description |
|---|---|
SLACK_ENABLE | Set to true to enable Slack notifications. |
SLACK_TOKEN | The authentication token for your Slack bot. |
SLACK_CHANNEL_ID | The ID of the Slack channel where alerts will be sent. |
Telegram Configuration
| Variable | Description |
|---|---|
TELEGRAM_ENABLE | Set to true to enable Telegram notifications. |
TELEGRAM_BOT_TOKEN | The authentication token for your Telegram bot. |
TELEGRAM_CHAT_ID | The chat ID where alerts will be sent. |
Email Configuration
| Variable | Description |
|---|---|
EMAIL_ENABLE | Set to true to enable email notifications. |
SMTP_HOST | The SMTP server hostname (e.g., smtp.gmail.com). |
SMTP_PORT | The SMTP server port (e.g., 587 for TLS). |
SMTP_USERNAME | The username/email for SMTP authentication. |
SMTP_PASSWORD | The password or app-specific password for SMTP authentication. |
EMAIL_TO | The recipient email address for incident notifications. |
EMAIL_SUBJECT | The subject line for email notifications. |
Microsoft Teams Configuration
| Variable | Description |
|---|---|
MSTEAMS_ENABLE | Set to true to enable Microsoft Teams notifications. |
MSTEAMS_WEBHOOK_URL | The incoming webhook URL for your Teams channel. |
AWS SNS Configuration
| Variable | Description |
|---|---|
SNS_ENABLE | Set to true to enable receive Alert Messages from SNS. |
SNS_HTTPS_ENDPOINT_SUBSCRIPTION | This specifies the HTTPS endpoint to which SNS sends messages. When an HTTPS endpoint is configured, an SNS subscription is automatically created. If no endpoint is configured, you must create the SNS subscription manually using the CLI or AWS Console. E.g. https://your-domain.com. |
SNS_TOPIC_ARN | AWS ARN of the SNS topic to subscribe to. |
On-Call Configuration
| Variable | Description |
|---|---|
ONCALL_ENABLE | Set to true to enable on-call functionality. |
AWS_INCIDENT_MANAGER_RESPONSE_PLAN_ARN | The ARN of the AWS Incident Manager response plan to use for on-call escalations. Required if on-call is enabled. |
Redis Configuration
| Variable | Description |
|---|---|
REDIS_HOST | The hostname or IP address of the Redis server. Required if on-call is enabled. |
REDIS_PORT | The port number of the Redis server. Required if on-call is enabled. |
REDIS_PASSWORD | The password for authenticating with the Redis server. Required if on-call is enabled and Redis requires authentication. |
Ensure these environment variables are properly set before running the application.
Advanced API Usage
We provide a way to overwrite configuration values using query parameters, allowing you to send alerts to different channel IDs based on the service.
| Query | Description |
|---|---|
slack_channel_id | The ID of the Slack channel where alerts will be sent. Use: /api/incidents?slack_channel_id=<your_vaule>. |
msteams_other_webhook_url | (Optional) Overrides the default Microsoft Teams channel by specifying an alternative webhook key (e.g., qc, ops, dev). Use: /api/incidents?msteams_other_webhook_url=qc. |
oncall_enable | Set to true or false to enable or disable on-call for a specific alert. Use: /api/incidents?oncall_enable=false. |
oncall_wait_minutes | Set the number of minutes to wait for acknowledgment before triggering on-call. Set to 0 to trigger immediately. Use: /api/incidents?oncall_wait_minutes=0. |
Optional: Define additional webhook URLs for multiple MS Teams channels
name: versus
host: 0.0.0.0
port: 3000

alert:
  debug_body: true  # Default value, will be overridden by DEBUG_BODY env var

  slack:
    enable: false  # Default value, will be overridden by SLACK_ENABLE env var

  msteams:
    enable: false # Default value, will be overridden by MSTEAMS_ENABLE env var
    webhook_url: ${MSTEAMS_WEBHOOK_URL} # Default webhook URL for MS Teams
    template_path: "config/msteams_message.tmpl"
    other_webhook_url: # Optional: Define additional webhook URLs for multiple MS Teams channels
      qc: ${MSTEAMS_OTHER_WEBHOOK_URL_QC} # Webhook for QC team
      ops: ${MSTEAMS_OTHER_WEBHOOK_URL_OPS} # Webhook for Ops team
      dev: ${MSTEAMS_OTHER_WEBHOOK_URL_DEV} # Webhook for Dev team
Microsoft Teams Configuration
| Variable | Description |
|---|---|
MSTEAMS_WEBHOOK_URL | The incoming webhook URL for your Teams channel. |
MSTEAMS_OTHER_WEBHOOK_URL_QC | (Optional) Webhook URL for the QC team channel. |
MSTEAMS_OTHER_WEBHOOK_URL_OPS | (Optional) Webhook URL for the Ops team channel. |
MSTEAMS_OTHER_WEBHOOK_URL_DEV | (Optional) Webhook URL for the Dev team channel. |
Notes: The MSTEAMS_WEBHOOK_URL is the primary webhook URL, while the MSTEAMS_OTHER_WEBHOOK_URL_* variables are optional and allow routing alerts to specific Teams channels based on the msteams_other_webhook_url query parameter.
Example MS Teams:
To send an alert to the QC team’s Microsoft Teams channel:
curl -X POST http://localhost:3000/api/incidents?msteams_other_webhook_url=qc \
  -H "Content-Type: application/json" \
  -d '{
    "Logs": "[ERROR] Quality check failed.",
    "ServiceName": "qa-service",
    "UserID": "U12345"
  }'
Example On-call:
To disable on-call for a specific alert:
curl -X POST http://localhost:3000/api/incidents?oncall_enable=false \
  -H "Content-Type: application/json" \
  -d '{
    "Logs": "[ERROR] This is a test error.",
    "ServiceName": "test-service",
    "UserID": "U12345"
  }'
To trigger on-call immediately without waiting:
curl -X POST http://localhost:3000/api/incidents?oncall_wait_minutes=0 \
  -H "Content-Type: application/json" \
  -d '{
    "Logs": "[ERROR] Urgent issue detected.",
    "ServiceName": "urgent-service",
    "UserID": "U12345"
  }'
Template Syntax Guide
This document explains the template syntax (Go template syntax) used for create a custom alert template in Versus Incident.
Table of Contents
Basic Syntax
Access Data
Access data fields using double curly braces and dot notation, for example, with the data:
{
  "Logs": "[ERROR] This is an error log from User Service that we can obtain using Fluent Bit.",
  "ServiceName": "order-service",
}
Example template:
*Error in {{ .ServiceName }}*
{{ .Logs }}
Variables
You can declare variables within a template using the {{ $variable := value }} syntax. Once declared, variables can be used throughout the template, for example:
{{ $owner := "Team Alpha" }}
Owner: {{ $owner }}
Output:
Owner: Team Alpha
Pipelines
Pipelines allow you to chain together multiple actions or functions. The result of one action can be passed as input to another, for example:
upper: Converts a string to uppercase.
*{{ .ServiceName | upper }} Failure*
lower: Converts a string to lowercase.
*{{ .ServiceName | lower }} Failure*
title: Converts a string to title case (first letter of each word capitalized).
*{{ .ServiceName | title }} Failure*
default: Provides a default value if the input is empty.
*{{ .ServiceName | default "unknown-service" }} Failure*
slice: Extracts a sub-slice from a slice or string.
{{ .Logs | slice 0 50 }} // First 50 characters
replace: Replaces occurrences of a substring.
{{ .Logs | replace "error" "issue" }}
trimPrefix: Trims a prefix from a string.
{{ .Logs | trimPrefix "prod-" }}
trimSuffix: Trims a suffix from a string.
{{ .Logs | trimSuffix "-service" }}
len: Returns the length
{{ .Logs | len }} // Length of the message
urlquery: Escapes a string for use in a URL query.
uri /search?q={{ .Query | urlquery }}
You can chain multiple pipes together:
{{ .Logs | trim | lower | truncate 50 }}
Control Structures
Conditionals
The templates support conditional logic using if, else, and end keywords.
{{ if .IsCritical }}
🚨 CRITICAL ALERT 🚨
{{ else }}
⚠️ Warning Alert ⚠️
{{ end }}
and:
{{ and .Value1 .Value2 .Value3 }}
or:
{{ or .Value1 .Value2 "default" }}
Best Practices
Error Handling:
{{ If .Error }}
  {{ .Details }}
{{ else }}
  No error details
{{ end }}
Whitespace Control:
{{- if .Production }}  // Remove preceding whitespace
PROD ALERT{{ end -}}   // Remove trailing whitespace
Template Comments:
{{/* This is a hidden comment */}}
Negates a boolean value:
{{ if not .IsCritical }}
  This is not a critical issue.
{{ end }}
Checks if two values are equal:
{{ if eq .Status "critical" }}
  🚨 Critical Alert 🚨
{{ end }}
Checks if two values are not equal:
{{ if ne .Env "production" }}
  This is not a production environment.
{{ end }}
Returns the length of a string, slice, array, or map:
{{ if gt (len .Errors) 0 }}
  There are {{ len .Errors }} errors.
{{ end }}
Checks if a string has a specific prefix:
{{ if .ServiceName | hasPrefix "prod-" }}
  Production service!
{{ end }}
Checks if a string has a specific suffix:
{{ if .ServiceName | hasSuffix "-service" }}
  This is a service.
{{ end }}
Checks if a message contains a specific strings:
{{ if contains .Logs "error" }}
  The message contains error logs.
{{ else }}
  The message does NOT contain error.
{{ end }}
Loops
Iterate over slices/arrays with range:
{{ range .ErrorStack }}
- {{ . }}
{{ end }}
How to Customize Alert Messages from Alertmanager to Slack and Telegram
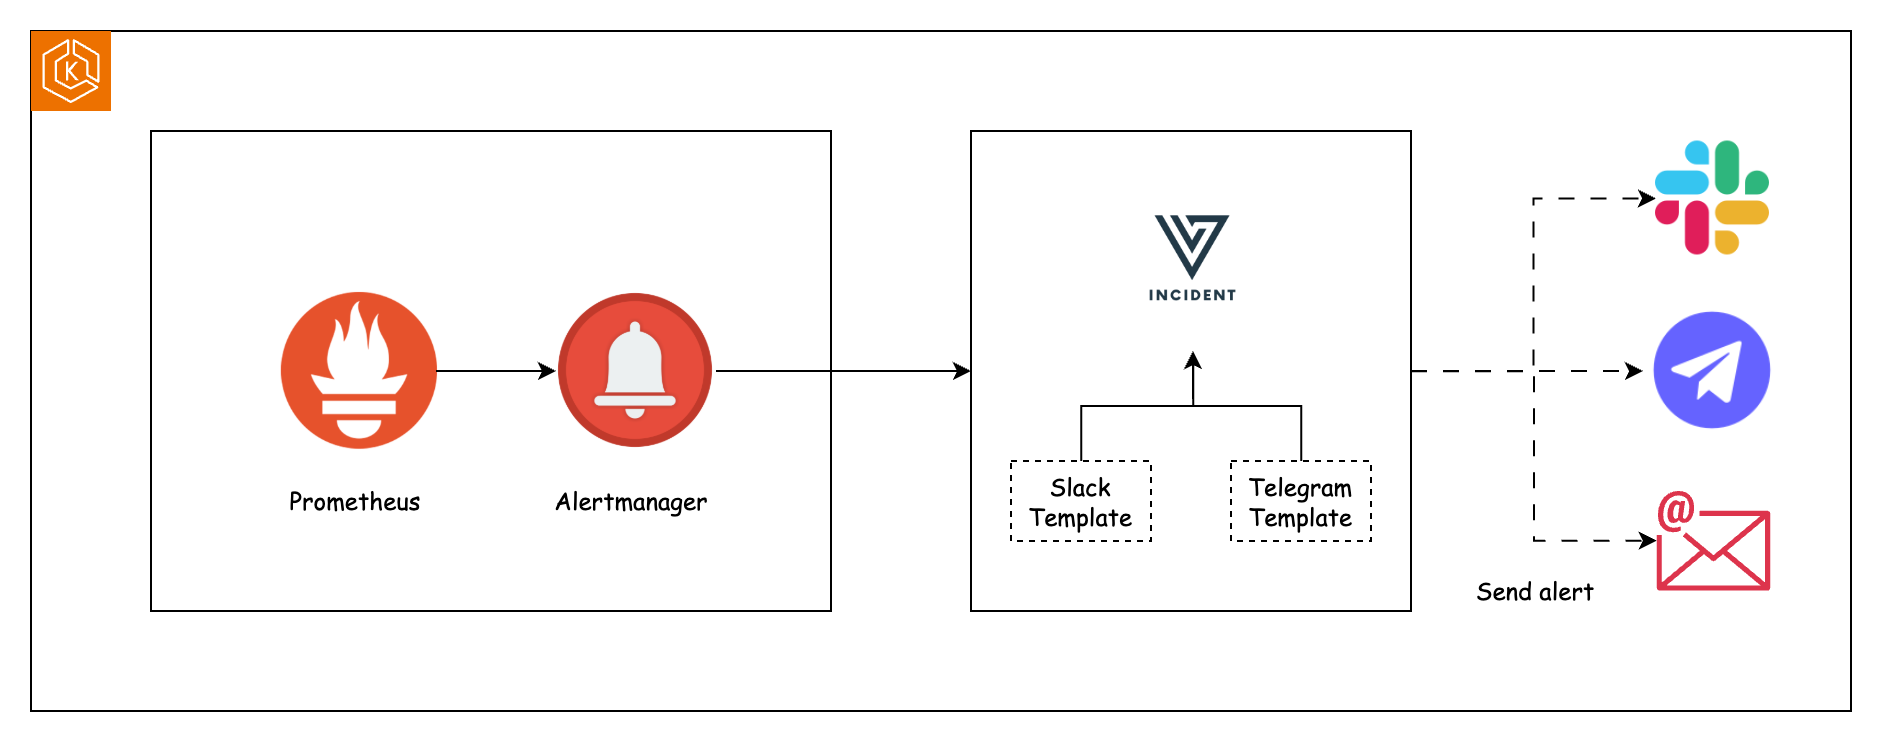
In this guide, you'll learn how to route Prometheus Alertmanager alerts to Slack and Telegram using the Versus Incident, while fully customizing alert messages.
Configure Alertmanager Webhook
Update your alertmanager.yml to forward alerts to Versus:
route:
  receiver: 'versus-incident'
  group_wait: 10s

receivers:
- name: 'versus-incident'
  webhook_configs:
  - url: 'http://versus-host:3000/api/incidents' # Versus API endpoint
    send_resolved: false
    # Additional settings (if needed):
    # http_config:
    #   tls_config:
    #     insecure_skip_verify: true  # For self-signed certificates
For example, alert rules:
groups:
  - name: cluster
    rules:
      - alert: PostgresqlDown
        expr: pg_up == 0
        for: 0m
        labels:
            severity: critical
        annotations:
            summary: Postgresql down (instance {{ $labels.instance }})
            description: "Postgresql instance is down."
Alertmanager sends alerts to the webhook in JSON format. Here’s an example of the payload:
{
  "receiver": "webhook-incident",
  "status": "firing",
  "alerts": [
    {
      "status": "firing",
      "labels": {
        "alertname": "PostgresqlDown",
        "instance": "postgresql-prod-01",
        "severity": "critical"
      },
      "annotations": {
        "summary": "Postgresql down (instance postgresql-prod-01)",
        "description": "Postgresql instance is down."
      },
      "startsAt": "2023-10-01T12:34:56.789Z",
      "endsAt": "0001-01-01T00:00:00Z",
      "generatorURL": ""
    }
  ],
  "groupLabels": {
    "alertname": "PostgresqlDown"
  },
  "commonLabels": {
    "alertname": "PostgresqlDown",
    "severity": "critical",
    "instance": "postgresql-prod-01"
  },
  "commonAnnotations": {
    "summary": "Postgresql down (instance postgresql-prod-01)",
    "description": "Postgresql instance is down."
  },
  "externalURL": ""
}
Next, we will deploy Versus Incident and configure it with a custom template to send alerts to both Slack and Telegram for this payload.
Launch Versus with Slack/Telegram
Create a configuration file config/config.yaml:
name: versus
host: 0.0.0.0
port: 3000

alert:
  slack:
    enable: true
    token: ${SLACK_TOKEN}
    channel_id: ${SLACK_CHANNEL_ID}
    template_path: "/app/config/slack_message.tmpl"

  telegram:
    enable: true
    bot_token: ${TELEGRAM_BOT_TOKEN}
    chat_id: ${TELEGRAM_CHAT_ID}
    template_path: "/app/config/telegram_message.tmpl"
Create Slack and Telegram templates.
config/slack_message.tmpl:
🔥 *{{ .commonLabels.severity | upper }} Alert: {{ .commonLabels.alertname }}*

🌐 *Instance*: `{{ .commonLabels.instance }}`
🚨 *Status*: `{{ .status }}`

{{ range .alerts }}
📝 {{ .annotations.description }}
⏰ *Firing since*: {{ .startsAt | formatTime }}
{{ end }}

🔗 *Dashboard*: <{{ .externalURL }}|Investigate>
telegram_message.tmpl:
🚩 <b>{{ .commonLabels.alertname }}</b>

{{ range .alerts }}
🕒 {{ .startsAt | formatTime }}
{{ .annotations.summary }}
{{ end }}

<pre>
Status: {{ .status }}
Severity: {{ .commonLabels.severity }}
</pre>
Run Versus:
docker run -d -p 3000:3000 \
  -e SLACK_ENABLE=true \
  -e SLACK_TOKEN=xoxb-your-token \
  -e SLACK_CHANNEL_ID=C12345 \
  -e TELEGRAM_ENABLE=true \
  -e TELEGRAM_BOT_TOKEN=123:ABC \
  -e TELEGRAM_CHAT_ID=-456789 \
  -v ./config:/app/config \
  ghcr.io/versuscontrol/versus-incident
Test
Trigger a test alert using curl:
curl -X POST http://localhost:3000/api/incidents \
  -H "Content-Type: application/json" \
  -d '{
    "receiver": "webhook-incident",
    "status": "firing",
    "alerts": [
      {
        "status": "firing",
        "labels": {
          "alertname": "PostgresqlDown",
          "instance": "postgresql-prod-01",
          "severity": "critical"
        },
        "annotations": {
          "summary": "Postgresql down (instance postgresql-prod-01)",
          "description": "Postgresql instance is down."
        },
        "startsAt": "2023-10-01T12:34:56.789Z",
        "endsAt": "0001-01-01T00:00:00Z",
        "generatorURL": ""
      }
    ],
    "groupLabels": {
      "alertname": "PostgresqlDown"
    },
    "commonLabels": {
      "alertname": "PostgresqlDown",
      "severity": "critical",
      "instance": "postgresql-prod-01"
    },
    "commonAnnotations": {
      "summary": "Postgresql down (instance postgresql-prod-01)",
      "description": "Postgresql instance is down."
    },
    "externalURL": ""
  }'
Final Result:
Advanced: Dynamic Channel Routing
Override Slack channels per alert using query parameters:
POST http://versus-host:3000/api/incidents?slack_channel_id=EMERGENCY-CHANNEL
Troubleshooting Tips
- Enable debug mode:
DEBUG_BODY=true - Check Versus logs:
docker logs versus
If you encounter any issues or have further questions, feel free to reach out!
Configuring Fluent Bit to Send Error Logs to Versus Incident
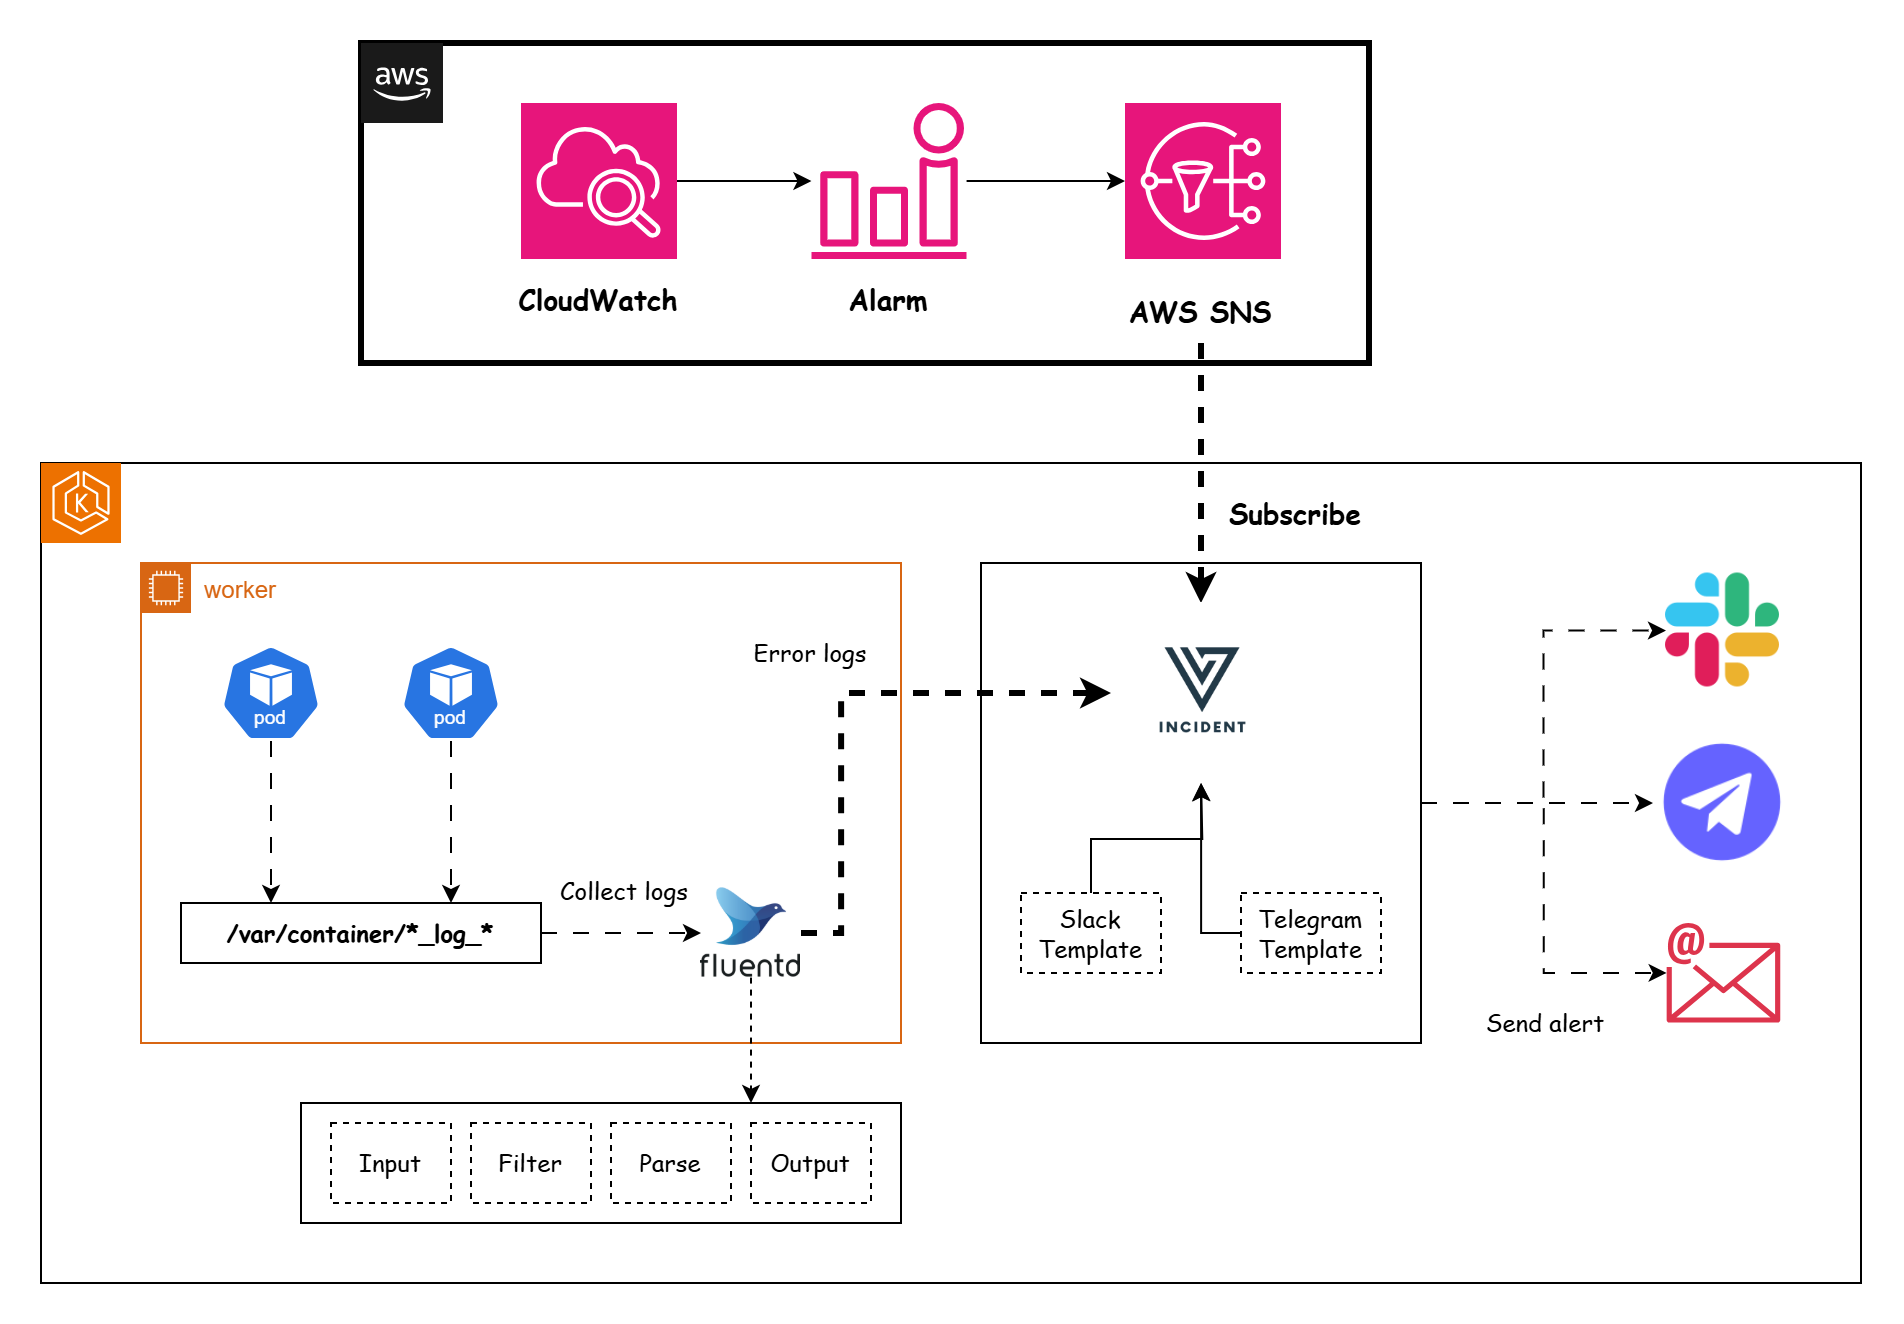
Fluent Bit is a lightweight log processor and forwarder that can filter, modify, and forward logs to various destinations. In this tutorial, we will configure Fluent Bit to filter logs containing [ERROR] and send them to the Versus Incident Management System using its REST API.
Understand the Log Format
The log format provided is as follows, you can create a sample.log file:
[2023/01/22 09:46:49] [ INFO ] This is info logs 1
[2023/01/22 09:46:49] [ INFO ] This is info logs 2
[2023/01/22 09:46:49] [ INFO ] This is info logs 3
[2023/01/22 09:46:49] [ ERROR ] This is error logs
We are interested in filtering logs that contain [ ERROR ].
Configure Fluent Bit Filters
To filter and process logs, we use the grep and modify filters in Fluent Bit.
Filter Configuration
Add the following configuration to your Fluent Bit configuration file:
# Filter Section - Grep for ERROR logs
[FILTER]
    Name    grep
    Match   versus.*
    Regex   log .*\[.*ERROR.*\].*

# Filter Section - Modify fields
[FILTER]
    Name    modify
    Match   versus.*
    Rename  log Logs
    Set     ServiceName order-service
Explanation
- Grep Filter:
- Matches all logs that contain
[ ERROR ]. - The
Regexfield uses a regular expression to identify logs with the[ ERROR ]keyword.
- Modify Filter:
- Adds or modifies fields in the log record.
- Sets the
ServiceNamefield for the default template. You can set the fields you want based on your template.
Default Telegram Template
🚨 <b>Critical Error Detected!</b> 🚨
📌 <b>Service:</b> {{.ServiceName}}
⚠️ <b>Error Details:</b>
{{.Logs}}
Configure Fluent Bit Output
To send filtered logs to the Versus Incident Management System, we use the http output plugin.
Output Configuration
Add the following configuration to your Fluent Bit configuration file:
...
# Output Section - Send logs to Versus Incident via HTTP
[OUTPUT]
    Name    http
    Match   versus.*
    Host    localhost
    Port    3000
    URI     /api/incidents
    Format  json_stream
Explanation
- Name: Specifies the output plugin (
httpin this case). - Match: Matches all logs processed by the previous filters.
- Host and Port: Specify the host and port of the Versus Incident Management System (default is
localhost:3000). - URI: Specifies the endpoint for creating incidents (
/api/incidents). - Format: Ensures the payload is sent in JSON Stream format.
Full Fluent Bit Configuration Example
Here is the complete Fluent Bit configuration file:
# Input Section
[INPUT]
    Name   tail
    Path   sample.log
    Tag    versus.*
    Mem_Buf_Limit 5MB
    Skip_Long_Lines On

# Filter Section - Grep for ERROR logs
[FILTER]
    Name    grep
    Match   versus.*
    Regex   log .*\[.*ERROR.*\].*

# Filter Section - Modify fields
[FILTER]
    Name    modify
    Match   versus.*
    Rename  log Logs
    Set     ServiceName order-service

# Output Section - Send logs to Versus Incident via HTTP
[OUTPUT]
    Name    http
    Match   versus.*
    Host    localhost
    Port    3000
    URI     /api/incidents
    Format  json_stream
Test the Configuration
Run Versus Incident:
docker run -p 3000:3000 \
  -e TELEGRAM_ENABLE=true \
  -e TELEGRAM_BOT_TOKEN=your_token \
  -e TELEGRAM_CHAT_ID=your_channel \
  ghcr.io/versuscontrol/versus-incident
Run Fluent Bit with the configuration file:
fluent-bit -c /path/to/fluent-bit.conf
Check the logs in the Versus Incident Management System. You should see an incident created with the following details:
Raw Request Body: {"date":1738999456.96342,"Logs":"[2023/01/22 09:46:49] [ ERROR ] This is error logs","ServiceName":"order-service"}
2025/02/08 14:24:18 POST /api/incidents 201 127.0.0.1 Fluent-Bit
Conclusion
By following the steps above, you can configure Fluent Bit to filter error logs and send them to the Versus Incident Management System. This integration enables automated incident management, ensuring that critical errors are promptly addressed by your DevOps team.
If you encounter any issues or have further questions, feel free to reach out!
Configuring CloudWatch to send Alert to Versus Incident
In this guide, you’ll learn how to set up a CloudWatch alarm to trigger when RDS CPU usage exceeds 80% and send an alert to Slack and Telegram.
Prerequisites
AWS account with access to RDS, CloudWatch, and SNS. An RDS instance running (replace my-rds-instance with your instance ID). Slack and Telegram API Token.
Steps
-
Create SNS Topic and Subscription.
-
Create CloudWatch Alarm.
-
Deploy Versus Incident with Slack and Telegram configurations.
-
Subscribe Versus to the SNS Topic.
Create an SNS Topic
Create an SNS topic to route CloudWatch Alarms to Versus:
aws sns create-topic --name RDS-CPU-Alarm-Topic
Create a CloudWatch Alarm for RDS CPU
Set up an alarm to trigger when RDS CPU exceeds 80% for 5 minutes.
aws cloudwatch put-metric-alarm \
  --alarm-name "RDS_CPU_High" \
  --alarm-description "RDS CPU utilization over 80%" \
  --namespace AWS/RDS \
  --metric-name CPUUtilization \
  --dimensions Name=DBInstanceIdentifier,Value=my-rds-instance \
  --statistic Average \
  --period 300 \
  --threshold 80 \
  --comparison-operator GreaterThanThreshold \
  --evaluation-periods 1 \
  --alarm-actions arn:aws:sns:us-east-1:123456789012:RDS-CPU-Alarm-Topic
Explanation:
--namespace AWS/RDS: Specifies RDS metrics.--metric-name CPUUtilization: Tracks CPU usage.--dimensions: Identifies your RDS instance.--alarm-actions: The SNS topic ARN where alerts are sent.
Versus Incident
Next, we will deploy Versus Incident and configure it with a custom template to send alerts to both Slack and Telegram. Enable SNS support in config/config.yaml:
name: versus
host: 0.0.0.0
port: 3000

alert:
  debug_body: true

  slack:
    enable: true
    token: ${SLACK_TOKEN}
    channel_id: ${SLACK_CHANNEL_ID}
    template_path: "/app/config/slack_message.tmpl"

  telegram:
    enable: true
    bot_token: ${TELEGRAM_BOT_TOKEN}
    chat_id: ${TELEGRAM_CHAT_ID}
    template_path: "/app/config/telegram_message.tmpl"

queue:
  enable: true
  sns:
    enable: true
    https_endpoint_subscription_path: /sns
When your RDS_CPU_High alarm triggers, SNS will send a notification to your HTTP endpoint. The message will be a JSON object wrapped in an SNS envelope. Here’s an example of what the JSON payload of Message field might look like:
{
  "AlarmName": "RDS_CPU_High",
  "AlarmDescription": "RDS CPU utilization over 80%",
  "AWSAccountId": "123456789012",
  "NewStateValue": "ALARM",
  "NewStateReason": "Threshold Crossed: 1 out of the last 1 datapoints was greater than the threshold (80.0). The most recent datapoint: 85.3.",
  "StateChangeTime": "2025-03-17T12:34:56.789Z",
  "Region": "US East (N. Virginia)",
  "OldStateValue": "OK",
  "Trigger": {
    "MetricName": "CPUUtilization",
    "Namespace": "AWS/RDS",
    "StatisticType": "Statistic",
    "Statistic": "AVERAGE",
    "Unit": "Percent",
    "Period": 300,
    "EvaluationPeriods": 1,
    "ComparisonOperator": "GreaterThanThreshold",
    "Threshold": 80.0,
    "TreatMissingData": "missing",
    "Dimensions": [
      {
        "Name": "DBInstanceIdentifier",
        "Value": "my-rds-instance"
      }
    ]
  }
}
Create Slack and Telegram templates, e.g. config/slack_message.tmpl:
*🚨 CloudWatch Alarm: {{.AlarmName}}*
----------
Description: {{.AlarmDescription}}
Current State: {{.NewStateValue}}
Timestamp: {{.StateChangeTime}}
----------
Owner <@${USERID}>: Investigate immediately!
config/telegram_message.tmpl:
🚨 <b>{{.AlarmName}}</b>
📌 <b>Status:</b> {{.NewStateValue}}
⚠️ <b>Description:</b> {{.AlarmDescription}}
🕒 <b>Time:</b> {{.StateChangeTime}}
Deploy with Docker:
docker run -d \
  -p 3000:3000 \
  -v $(pwd)/config:/app/config \
  -e SLACK_ENABLE=true \
  -e SLACK_TOKEN=your_slack_token \
  -e SLACK_CHANNEL_ID=your_channel_id \
  -e TELEGRAM_ENABLE=true \
  -e TELEGRAM_BOT_TOKEN=your_token \
  -e TELEGRAM_CHAT_ID=your_channel \
  --name versus \
  ghcr.io/versuscontrol/versus-incident
Versus Incident is running and accessible at:
http://localhost:3000/sns
For testing purposes, we can use ngrok to enable the Versus on localhost that can be accessed via the internet.
ngrok http 3000 --url your-versus-https-url.ngrok-free.app
This URL is available to anyone on the internet.
Subscribe Versus to the SNS Topic
Subscribe Versus’s /sns endpoint to the topic. Replace versus-host with your deployment URL:
aws sns subscribe \
  --topic-arn arn:aws:sns:us-east-1:123456789012:RDS-CPU-Alarm-Topic \
  --protocol https \
  --notification-endpoint https://your-versus-https-url.ngrok-free.app/sns
Test the Integration
- Simulate high CPU load on your RDS instance (e.g., run intensive queries).
- Check the CloudWatch console to confirm the alarm triggers.
- Verify Versus Incident receives the SNS payload and sends alerts to Slack and Telegram.
Conclusion
By integrating CloudWatch Alarms with Versus Incident via SNS, you centralize alert management and ensure critical infrastructure issues are promptly routed to Slack, Telegram, or Email.
If you encounter any issues or have further questions, feel free to reach out!
How to Configure Sentry to Send Alerts to MS Teams
This guide will show you how to route Sentry alerts through Versus Incident to Microsoft Teams, enabling your team to respond to application issues quickly and efficiently.
Prerequisites
- Microsoft Teams channel with webhook permissions
- Sentry account with project owner permissions
Set Up an MS Teams Webhook
First, create an incoming webhook in MS Teams to receive alerts from Versus Incident.
- Open MS Teams and go to the channel where you want alerts to appear.
- Click the three dots
(…)next to the channel name and select Connectors. - Find Incoming Webhook, click Add, then Add again in the popup.
- Name your webhook (e.g., Sentry Alerts) and optionally upload an image.
- Click Create, then copy the generated webhook URL. Save this URL — you’ll need it later.
Deploy Versus Incident with MS Teams Enabled
Next, configure Versus Incident to forward alerts to MS Teams using the webhook URL you created.
Create a directory for your configuration files:
mkdir -p ./config
Create config/config.yaml with the following content:
name: versus
host: 0.0.0.0
port: 3000

alert:
  msteams:
    enable: true
    webhook_url: ${MSTEAMS_WEBHOOK_URL}
    template_path: "/app/config/msteams_message.tmpl"
Create a custom MS Teams template in config/msteams_message.tmpl, for example, the JSON Format for Sentry Webhooks Integration:
{
  "action": "created",
  "data": {
    "issue": {
      "id": "123456",
      "title": "Example Issue",
      "culprit": "example_function in example_module",
      "shortId": "PROJECT-1",
      "project": {
        "id": "1",
        "name": "Example Project",
        "slug": "example-project"
      },
      "metadata": {
        "type": "ExampleError",
        "value": "This is an example error"
      },
      "status": "unresolved",
      "level": "error",
      "firstSeen": "2023-10-01T12:00:00Z",
      "lastSeen": "2023-10-01T12:05:00Z",
      "count": 5,
      "userCount": 3
    }
  },
  "installation": {
    "uuid": "installation-uuid"
  },
  "actor": {
    "type": "user",
    "id": "789",
    "name": "John Doe"
  }
}
config/msteams_message.tmpl:
**🚨 Sentry Alert: {{.data.issue.title}}**

**Project**: {{.data.issue.project.name}}

**Issue URL**: {{.data.issue.url}}

Please investigate this issue immediately.
This template uses Markdown to format the alert in MS Teams. It pulls data from the Sentry webhook payload (e.g., {{.data.issue.title}}).
Run Versus Incident using Docker, mounting your configuration files and setting the MS Teams webhook URL as an environment variable:
docker run -d \
  -p 3000:3000 \
  -v $(pwd)/config:/app/config \
  -e MSTEAMS_ENABLE=true \
  -e MSTEAMS_WEBHOOK_URL="your_teams_webhook_url" \
  --name versus \
  ghcr.io/versuscontrol/versus-incident
Replace your_teams_webhook_url with the webhook URL. The Versus Incident API endpoint for receiving alerts is now available at:
http://localhost:3000/api/incidents
Configure Sentry Alerts with a Webhook
Now, set up Sentry to send alerts to Versus Incident via a webhook.
- Log in to your Sentry account and navigate to your project.
- Go to Alerts in the sidebar and click Create Alert Rule.
- Define the conditions for your alert, such as:
- When: “A new issue is created”
- Filter: (Optional) Add filters like “error level is fatal”
- Under Actions, select Send a notification via a webhook.
- Enter the webhook URL:
- If Versus is running locally:
http://localhost:3000/api/incidents - If deployed elsewhere:
https://your-versus-domain.com/api/incidents
- Ensure the HTTP method is POST and the content type is application/json.
- Save the alert rule.
Sentry will now send a JSON payload to Versus Incident whenever the alert conditions are met.
Test the Integration
To confirm everything works, simulate a Sentry alert using curl:
curl -X POST http://localhost:3000/api/incidents \
  -H "Content-Type: application/json" \
  -d '{
    "action": "triggered",
    "data": {
      "issue": {
        "id": "123456",
        "title": "Test Error: Something went wrong",
        "shortId": "PROJECT-1",
        "project": {
          "name": "Test Project",
          "slug": "test-project"
        },
        "url": "https://sentry.io/organizations/test-org/issues/123456/"
      }
    }
  }'
Alternatively, trigger a real error in your Sentry-monitored application and verify the alert appears in MS Teams.
Conclusion
By connecting Sentry to MS Teams via Versus Incident, you’ve created a streamlined alerting system that keeps your team informed of critical issues in real-time. Versus Incident’s flexibility allows you to tailor alerts to your needs and expand to other channels as required.
On Call
This document provides a step-by-step guide to integrating Versus Incident with an on-call solutions. We currently support AWS Incident Manager, and our next plan is to support more tools.
Before diving into how Versus integrates with AWS Incident Manager, let’s start with the basics. You need to understand what AWS Incident Manager On-Call is.
Understanding AWS Incident Manager On-Call
Understanding AWS Incident Manager On-Call
AWS On-Call is a service that helps organizations manage and respond to incidents quickly and effectively. It’s part of AWS Systems Manager. This document explains the key parts of AWS Incident Manager On-Call—contacts, escalation plans, runbooks, and response plans—in a simple and clear way.
Key Components of AWS Incident Manager On-Call
AWS Incident Manager On-Call relies on four main pieces: contacts, escalation plans, runbooks, and response plans. Let’s break them down one by one.
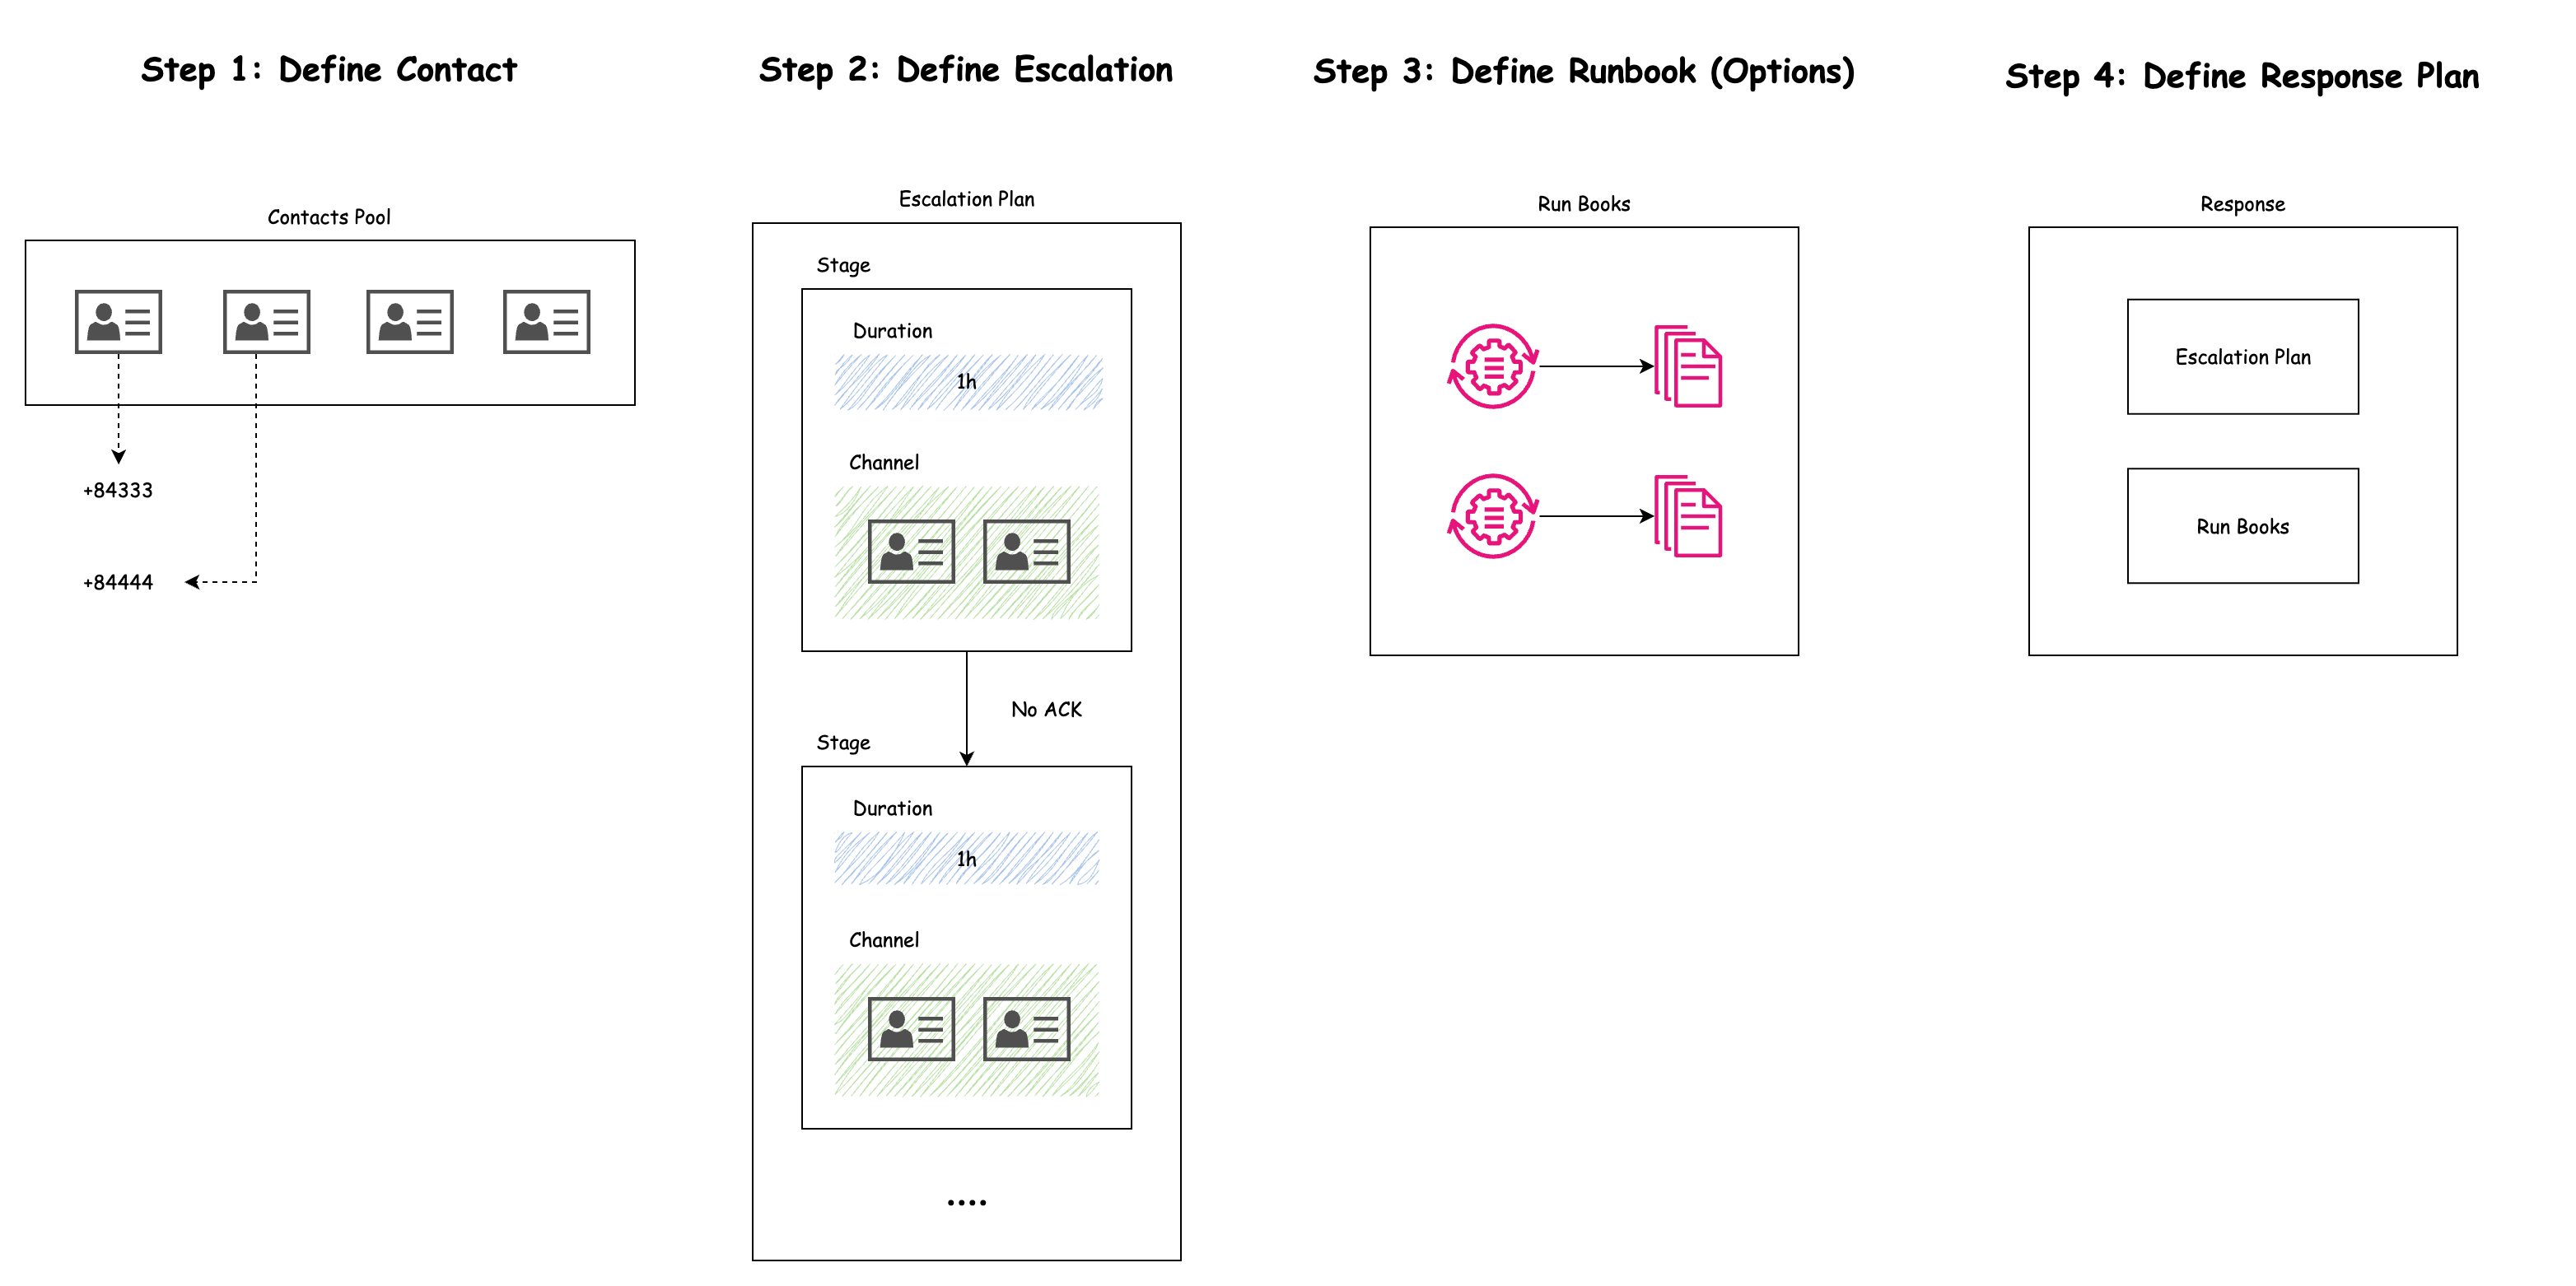
1. Contacts
Contacts are the people who get notified when an incident happens. These could be:
- On-call engineers (the ones on duty to fix things).
- Experts who know specific systems.
- Managers or anyone else who needs to stay in the loop.
Each contact has contact methods—ways to reach them, like:
- SMS (text messages).
- Email.
- Voice calls.
Example: Imagine Natsu is an on-call engineer. His contact info might include:
- SMS: +84 3127 12 567
- Email: natsu@devopsvn.tech
If an incident occurs, AWS Incident Manager can send him a text and an email to let him know she’s needed.
2. Escalation Plans
An escalation plan is a set of rules that decides who gets notified—and in what order—if an incident isn’t handled quickly. It’s like a backup plan to make sure someone responds, even if the first person is unavailable.
You can set it up to:
- Notify people simultaneously (all at once).
- Notify people sequentially (one after another, with a timeout between each).
Example: Suppose you have three engineers: Natsu, Zeref, and Igneel. Your escalation plan might say:
- Stage 1: Notify Natsu.
- Stage 2: If Natsu doesn’t respond in 5 minutes, notify Zeref.
- Stage 3: If Zeref doesn’t respond in another 5 minutes, notify Igneel.
This way, the incident doesn’t get stuck waiting for one person—it keeps moving until someone takes action.
3. Runbooks (Options)
Runbooks are like instruction manuals that AWS can follow automatically to fix an incident. They’re built in AWS Systems Manager Automation and contain steps to solve common problems without needing a human to step in.
Runbooks can:
- Restart a crashed service.
- Add more resources (like extra servers) if something’s overloaded.
- Run checks to figure out what’s wrong.
Example: Let’s say your web server stops working. A runbook called “WebServerRestart” could:
- Automatically detect the issue.
- Restart the server in seconds.
This saves time by fixing the problem before an engineer even picks up their phone.
4. Response Plans
A response plan is the master plan that pulls everything together. It tells AWS Incident Manager:
- Which contacts to notify.
- Which escalation plan to follow.
- Which runbooks to run.
It can have multiple stages, each with its own actions and time limits, to handle an incident step-by-step.
Example: For a critical incident (like a web application going offline), a response plan might look like this:
- 1: Run the “WebServerRestart” runbook and notify Natsu.
- 2: If the issue isn’t fixed in 5 minutes, notify Bob (via the escalation plan).
- 3: If it’s still not resolved in 10 minutes, alert the manager.
This ensures both automation and people work together to fix the problem.
Next, we will provide a step-by-step guide to integrating Versus with AWS Incident Manager for On Call: Integration.
How to Integration
This document provides a step-by-step guide to integrate Versus Incident with AWS Incident Manager make an On Call. The integration enables automated escalation of alerts to on-call teams when incidents are not acknowledged within a specified time.
We'll cover configuring Prometheus Alert Manager to send alerts to Versus, setting up AWS Incident Manager, deploying Versus, and testing the integration with a practical example.
Prerequisites
Before you begin, ensure you have:
- An AWS account with access to AWS Incident Manager.
- Versus Incident deployed (instructions provided later).
- Prometheus Alert Manager set up to monitor your systems.
Setting Up AWS Incident Manager for On-Call
AWS Incident Manager requires configuring several components to manage on-call workflows. Let’s configure a practical example using 6 contacts, two teams, and a two-stage response plan. Use the AWS Console to set these up.
Contacts
Contacts are individuals who will be notified during an incident.
- In the AWS Console, navigate to Systems Manager > Incident Manager > Contacts.
- Click Create contact.
- For each contact:
- Enter a Name (e.g., "Natsu Dragneel").
- Add Contact methods (e.g., SMS: +1-555-123-4567, Email: natsu@devopsvn.tech).
- Save the contact.
Repeat to create 6 contacts (e.g., Natsu, Zeref, Igneel, Gray, Gajeel, Laxus).
Escalation Plan
An escalation plan defines the order in which contacts are engaged.
- Go to Incident Manager > Escalation plans > Create escalation plan.
- Name it (e.g., "TeamA_Escalation").
- Add contacts (e.g., Natsu, Zeref, and Igneel) and set them to engage simultaneously or sequentially.
- Save the plan.
- Create a second plan (e.g., "TeamB_Escalation") for Gray, Gajeel, and Laxus.
RunBook (Optional)
RunBooks automate incident resolution steps. For this guide, we’ll skip RunBook creation, but you can define one in AWS Systems Manager Automation if needed.
Response Plan
A response plan ties contacts and escalation plans into a structured response.
- Go to Incident Manager > Response plans > Create response plan.
- Name it (e.g., "CriticalIncidentResponse").
- Define two stages:
- Stage 1: Engage "TeamA_Escalation" (Natsu, Zeref, and Igneel) with a 5-minute timeout.
- Stage 2: If unacknowledged, engage "TeamB_Escalation" (Gray, Gajeel, and Laxus).
- Save the plan and note its ARN (e.g.,
arn:aws:ssm-incidents::111122223333:response-plan/CriticalIncidentResponse).
Define IAM Role for Versus
Versus needs permissions to interact with AWS Incident Manager.
- In the AWS Console, go to IAM > Roles > Create role.
- Choose AWS service as the trusted entity and select EC2 (or your deployment type, e.g., ECS).
- Attach a custom policy with these permissions:
{
    "Version": "2012-10-17",
    "Statement": [
        {
            "Effect": "Allow",
            "Action": [
                "ssm-incidents:StartIncident",
                "ssm-incidents:GetResponsePlan"
            ],
            "Resource": "*"
        }
    ]
}
- Name the role (e.g., "VersusIncidentRole") and create it.
- Note the Role ARN (e.g.,
arn:aws:iam::111122223333:role/VersusIncidentRole).
Deploy Versus Incident
Deploy Versus using Docker or Kubernetes. Docker Deployment. Create a directory for your configuration files:
mkdir -p ./config
Create config/config.yaml with the following content:
name: versus
host: 0.0.0.0
port: 3000
public_host: https://your-ack-host.example

alert:
  debug_body: true

  slack:
    enable: true
    token: ${SLACK_TOKEN}
    channel_id: ${SLACK_CHANNEL_ID}
    template_path: "config/slack_message.tmpl"

oncall:
  enable: true
  wait_minutes: 3

  aws_incident_manager:
    response_plan_arn: ${AWS_INCIDENT_MANAGER_RESPONSE_PLAN_ARN}

redis: # Required for on-call functionality
  insecure_skip_verify: true # dev only
  host: ${REDIS_HOST}
  port: ${REDIS_PORT}
  password: ${REDIS_PASSWORD}
  db: 0
Create Slack templates config/slack_message.tmpl:
🔥 *{{ .commonLabels.severity | upper }} Alert: {{ .commonLabels.alertname }}*

🌐 *Instance*: `{{ .commonLabels.instance }}`
🚨 *Status*: `{{ .status }}`

{{ range .alerts }}
📝 {{ .annotations.description }}
{{ end }}
{{ if .AckURL }}
----------
<{{.AckURL}}|Click here to acknowledge>
{{ end }}
ACK URL Generation
- When an incident is created (e.g., via a POST to
/api/incidents), Versus generates an acknowledgment URL if on-call is enabled. - The URL is constructed using the
public_hostvalue, typically in the format:https://your-host.example/api/incidents/ack/<incident-id>. - This URL is injected into the alert data as a field (e.g.,
.AckURL) and becomes available for use in templates.
Create the docker-compose.yml file:
version: '3.8'

services:
  versus:
    image: ghcr.io/versuscontrol/versus-incident
    ports:
      - "3000:3000"
    environment:
      - SLACK_TOKEN=your_slack_token
      - SLACK_CHANNEL_ID=your_channel_id
      - AWS_INCIDENT_MANAGER_RESPONSE_PLAN_ARN=arn:aws:ssm-incidents::111122223333:response-plan/CriticalIncidentResponse
      - REDIS_HOST=redis
      - REDIS_PORT=6379
      - REDIS_PASSWORD=your_redis_password
    depends_on:
      - redis

  redis:
    image: redis:6.2-alpine
    command: redis-server --requirepass your_redis_password
    ports:
      - "6379:6379"
    volumes:
      - redis_data:/data

volumes:
  redis_data:
Note: If using AWS credentials, add AWS_ACCESS_KEY_ID and AWS_SECRET_ACCESS_KEY environment variables, or attach the IAM role to your deployment environment.
Run Docker Compose:
docker-compose up -d
Alert Rules
Create a prometheus.yml file to define a metric and alerting rule:
global:
  scrape_interval: 15s

scrape_configs:
  - job_name: 'server'
    static_configs:
      - targets: ['localhost:9090']

rule_files:
  - 'alert_rules.yml'
Create alert_rules.yml to define an alert:
groups:
- name: rate
  rules:

  - alert: HighErrorRate
    expr: rate(http_requests_total{status="500"}[5m]) > 0.1
    for: 5m
    labels:
      severity: warning
    annotations:
      summary: "High error rate detected in {{ $labels.service }}"
      description: "{{ $labels.service }} has an error rate above 0.1 for 5 minutes."

  - alert: HighErrorRate
    expr: rate(http_requests_total{status="500"}[5m]) > 0.5
    for: 2m
    labels:
      severity: critical
    annotations:
      summary: "Very high error rate detected in {{ $labels.service }}"
      description: "{{ $labels.service }} has an error rate above 0.5 for 2 minutes."

  - alert: HighErrorRate
    expr: rate(http_requests_total{status="500"}[5m]) > 0.8
    for: 1m
    labels:
      severity: urgent
    annotations:
      summary: "Extremely high error rate detected in {{ $labels.service }}"
      description: "{{ $labels.service }} has an error rate above 0.8 for 1 minute."
Alert Manager Routing Configuration
Configure Alert Manager to route alerts to Versus with different behaviors.
Send Alert Only (No On-Call)
receivers:
- name: 'versus-no-oncall'
  webhook_configs:
  - url: 'http://versus-service:3000/api/incidents?oncall_enable=false'
    send_resolved: false

route:
  receiver: 'versus-no-oncall'
  group_by: ['alertname', 'service']
  routes:
  - match:
      severity: warning
    receiver: 'versus-no-oncall'
Send Alert with Acknowledgment Wait
receivers:
- name: 'versus-with-ack'
  webhook_configs:
  - url: 'http://versus-service:3000/api/incidents?oncall_wait_minutes=5'
    send_resolved: false

route:
  routes:
  - match:
      severity: critical
    receiver: 'versus-with-ack'
This waits 5 minutes for acknowledgment before triggering the AWS Incident Manager Response Plan if the user doesn't click the link ACK that Versus sends to Slack.
Send Alert with Immediate On-Call Trigger
receivers:
- name: 'versus-immediate'
  webhook_configs:
  - url: 'http://versus-service:3000/api/incidents?oncall_wait_minutes=0'
    send_resolved: false

route:
  routes:
  - match:
      severity: urgent
    receiver: 'versus-immediate'
This triggers the response plan immediately without waiting.
Testing the Integration
- Trigger an Alert: Simulate a critical alert in Prometheus to match the Alert Manager rule.
- Verify Versus: Check that Versus receives the alert and sends it to configured channels (e.g., Slack).
- Check Escalation:
- Wait 5 minutes without acknowledging the alert.
- In Incident Manager > Incidents, verify that an incident starts and Team A is engaged.
- After 5 more minutes, confirm Team B is engaged.
- Immediate Trigger Test: Send an urgent alert and confirm the response plan triggers instantly.
Conclusion
You’ve now integrated Versus Incident with AWS Incident Manager for on-call management! Alerts from Prometheus Alert Manager can trigger notifications via Versus, with escalations handled by AWS Incident Manager based on your response plan. Adjust configurations as needed for your environment.
If you encounter any issues or have further questions, feel free to reach out!
Slack Template for AWS SNS
1. AWS Glue Job Failure
SNS Message:
{
  "source": "aws.glue",
  "detail": {
    "jobName": "etl-pipeline",
    "state": "FAILED",
    "message": "OutOfMemoryError: Java heap space"
  }
}
Slack Template:
{{ if eq .source "aws.glue" }}
🔥 *Glue Job Failed*: {{.detail.jobName}}
❌ Error:
```{{.detail.message}}```
{{ end }}
2. EC2 Instance State Change
SNS Message:
{
  "source": "aws.ec2",
  "detail": {
    "instance-id": "i-1234567890abcdef0",
    "state": "stopped"
  }
}
Slack Template:
{{ if eq .source "aws.ec2" }}
🖥 *EC2 Instance {{.detail.state | title}}*
ID: `{{.detail.instance-id}}`
{{ end }}
3. CloudWatch Alarm Trigger
SNS Message:
{
  "source": "aws.cloudwatch",
  "detail": {
    "alarmName": "High-CPU-Utilization",
    "state": "ALARM",
    "metricName": "CPUUtilization",
    "threshold": 80,
    "actualValue": 92.5
  }
}
Slack Template:
{{ if eq .source "aws.cloudwatch" }}
🚨 *CloudWatch Alarm Triggered*
• Name: {{.detail.alarmName}}
• Metric: {{.detail.metricName}}
• Value: {{.detail.actualValue}}% (Threshold: {{.detail.threshold}}%)
{{ end }}
4. Lambda Function Error
SNS Message:
{
  "source": "aws.lambda",
  "detail": {
    "functionName": "data-processor",
    "errorType": "Runtime.ExitError",
    "errorMessage": "Process exited before completing request"
  }
}
Slack Template:
{{ if eq .source "aws.lambda" }}
λ *Lambda Failure*: {{.detail.functionName}}
⚠️ Error: {{.detail.errorType}}
💬 Message: {{.detail.errorMessage}}
{{ end }}
5. AWS CodePipeline Failure
Scenario: A pipeline deployment fails during the "Deploy" stage.
SNS Message:
{
  "source": "aws.codepipeline",
  "detail-type": "CodePipeline Pipeline Execution State Change",
  "detail": {
    "pipeline": "prod-deployment-pipeline",
    "state": "FAILED",
    "stage": "Deploy",
    "action": "DeployToECS",
    "failure-type": "JobFailed",
    "error": "ECS task definition invalid"
  }
}
Slack Template:
{{ if eq .source "aws.codepipeline" }}
🚛 *Pipeline Failed*: {{.detail.pipeline | upper}}
🛑 Stage: {{.detail.stage}} (Action: {{.detail.action}})
❌ Error:
```{{.detail.error}}```
{{ end }}
6. EC2 Spot Instance Interruption (via EventBridge)
Scenario: AWS reclaims a Spot Instance due to capacity needs.
SNS Message:
{
  "source": "aws.ec2",
  "detail-type": "EC2 Spot Instance Interruption Warning",
  "detail": {
    "instance-id": "i-0abcdef1234567890",
    "instance-action": "terminate",
    "instance-interruption-behavior": "terminate",
    "availability-zone": "us-east-1a",
    "instance-type": "r5.large"
  }
}
Slack Template:
{{ if eq .detail-type "EC2 Spot Instance Interruption Warning" }}
⚡ *Spot Instance Interruption*
Instance ID: `{{.detail.instance-id}}`
Action: {{.detail.instance-action | title}}
AZ: {{.detail.availability-zone}}
⚠️ **Warning**: Migrate workloads immediately!
{{ end }}
7. ECS Task Failure
Scenario: A critical ECS task crashes repeatedly.
SNS Message:
{
  "source": "aws.ecs",
  "detail-type": "ECS Task State Change",
  "detail": {
    "clusterArn": "arn:aws:ecs:us-east-1:123456789012:cluster/prod-cluster",
    "taskArn": "arn:aws:ecs:us-east-1:123456789012:task/prod-cluster/abc123",
    "lastStatus": "STOPPED",
    "stoppedReason": "Essential container exited"
  }
}
Slack Template:
{{ if eq .source "aws.ecs" }}
🎯 *ECS Task Stopped*
Cluster: {{.detail.clusterArn | splitList "/" | last}}
Reason:
```{{.detail.stoppedReason}}```
{{ end }}
8. DynamoDB Auto-Scaling Limit Reached
Scenario: DynamoDB hits provisioned throughput limits.
SNS Message:
{
  "source": "aws.dynamodb",
  "detail-type": "AWS API Call via CloudTrail",
  "detail": {
    "eventSource": "dynamodb.amazonaws.com",
    "eventName": "UpdateTable",
    "errorCode": "LimitExceededException",
    "errorMessage": "Table my-table exceeded maximum allowed provisioned throughput"
  }
}
Slack Template:
{{ if and (eq .source "aws.dynamodb") (eq .detail.errorCode "LimitExceededException") }}
📊 *DynamoDB Throughput Limit Exceeded*
Table: `{{.detail.requestParameters.tableName}}`
Error:
```{{.detail.errorMessage}}```
{{ end }}
9. AWS Health Event (Service Disruption)
Scenario: AWS reports a regional service disruption.
SNS Message:
{
  "source": "aws.health",
  "detail-type": "AWS Health Event",
  "detail": {
    "eventTypeCategory": "issue",
    "service": "EC2",
    "eventDescription": [{
      "language": "en",
      "latestDescription": "Degraded networking in us-east-1"
    }]
  }
}
Slack Template:
{{ if eq .source "aws.health" }}
🏥 *AWS Health Alert*
Service: {{.detail.service}}
Impact: {{.detail.eventTypeCategory | title}}
Description:
{{index .detail.eventDescription 0).latestDescription}}
{{ end }}
10. Amazon GuardDuty Finding
Scenario: Unauthorized API call detected.
SNS Message:
{
  "source": "aws.guardduty",
  "detail-type": "GuardDuty Finding",
  "detail": {
    "severity": 8.5,
    "type": "UnauthorizedAccess:EC2/SSHBruteForce",
    "resource": {
      "instanceDetails": {
        "instanceId": "i-0abcdef1234567890"
      }
    }
  }
}
Slack Template:
{{ if eq .source "aws.guardduty" }}
🛡️ *Security Alert*: {{.detail.type | replace "UnauthorizedAccess:" ""}}
Severity: {{.detail.severity}}/10
Instance: `{{.detail.resource.instanceDetails.instanceId}}`
{{ end }}
Test Templates Locally
Use the AWS CLI to send test SNS messages:
aws sns publish \
  --topic-arn arn:aws:sns:us-east-1:123456789012:MyTopic \
  --message file://test-event.json
Advanced Template Tips
Multi-Service Template
Handle multiple alerts in one template:
{{ $service := .source | replace "aws." "" | upper }}
📡 *{{$service}} Alert*

{{ if eq .source "aws.glue" }}
  🔧 Job: {{.detail.jobName}}
{{ else if eq .source "aws.ec2" }}
  🖥 Instance: {{.detail.instance-id}}
{{ end }}

🔗 *Details*: {{.detail | toJson}}
If the field does not exist when passed to the template, let's use the template's printf function to handle it.
{{ if contains (printf "%v" .source) "aws.glue" }}
🔥 *Glue Job Failed*: {{.detail.jobName}}

❌ Error:
```{{.detail.errorMessage}}```
{{ else }}
🔥 *Critical Error in {{.ServiceName}}*

❌ Error Details:
```{{.Logs}}```

Owner <@{{.UserID}}> please investigate
{{ end }}
Conditional Formatting
Highlight critical issues:
{{ if gt .detail.actualValue .detail.threshold }}
🚨 CRITICAL: {{.detail.alarmName}} ({{.detail.actualValue}}%)
{{ else }}
⚠️ WARNING: {{.detail.alarmName}} ({{.detail.actualValue}}%)
{{ end }}
Best Practices for Custom Templates
- Keep It Simple: Focus on the most critical details for each alert.
- Use Conditional Logic: Tailor messages based on event severity or type.
- Test Your Templates: Use sample SNS messages to validate your templates.
- Document Your Templates: Share templates with your team for consistency.